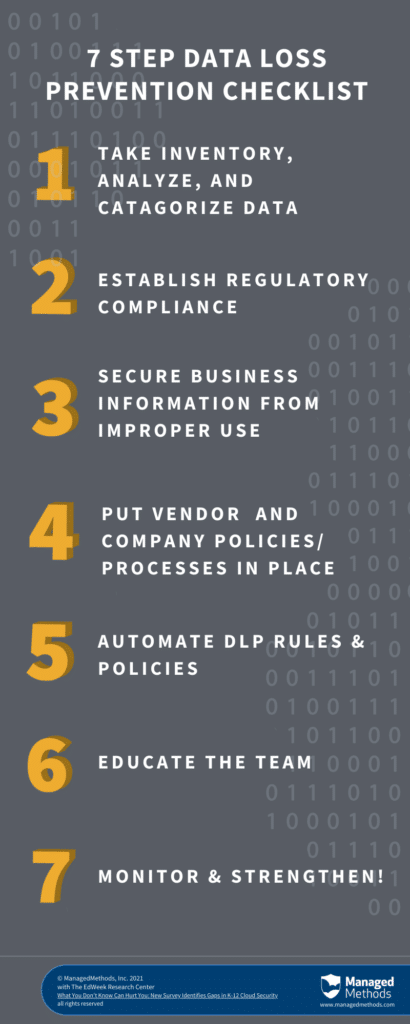
Use this 7 step data loss prevention checklist to help plan and tackle your DLP strategy
This data loss prevention checklist is meant to provide a framework for ensuring that your district’s sensitive data is secured from improper access—both internal and external.
But, you may first be wondering: what is data loss prevention? Data loss prevention (DLP) is simply a strategy and process for ensuring that information stored by your district is not improperly or unintentionally exposed. Easier said than done, right?
The most important data to secure is that which is regulated by federal, state, and/or local laws. This type of data broadly includes personally identifiable information, data related to minors, and health information. It could also include payment information, such as parent/guardian credit card or bank account information if your district retains that for lunches, field trips, etc.
School districts also have “business” information that needs to be protected. This includes information like district finances, payment information to vendors and contractors, and human resources information such as W2s.
Many education-focused software and SaaS applications on the market provide at least some level of DLP controls natively. But using these provided tools alone creates an incoherent (and risky) data security environment. They also don’t fully protect your district’s data infrastructure. There are many data loss prevention tools available on the market today that can help your IT team manage comprehensive data loss prevention methods across all digital data assets, including hardware, software, the cloud, and everywhere in between.
![[FREE OFFER] Audit Your Cloud App DLP Settings. 30 Day Free Trial >>](https://no-cache.hubspot.com/cta/default/6834707/803b7470-abb4-4fcd-80a5-e2499d4cbdf7.png)
7 Steps To Better Data Loss Prevention
Step 1. Inventory: Analyze & Categorize
The first step in creating a comprehensive DLP plan is determining where all your district’s data is located, and which of it is sensitive information. You’ll also want to analyze your current security posture in each of these locations to determine how data is being managed and protected, and where security gaps may exist.

Common locations for data include:
- On-premise / network storage
- Cloud / SaaS application storage
- Hardware storage, including laptops and desktops, mobile devices, external hard drives, etc.
Once you have a handle on where all your data resides, you’ll want to categorize it. Common data type categories include:
- Personally Identifiable Information (PII)
- Payment Card Information (PCI)
- Student Health Information & Individualized Education Plans (IEPs)
- Human Resources/Staff Information
- General Internal-Only Information
- Public Use / Domain Information
As an example, PII includes information such as social security numbers, names, addresses, etc. that can be used to commit identity fraud. Getting this type of information on kids is high-value for criminals, because their information is going to be squeaky clean, and usually isn’t being monitored. They can often get away with identity fraud for years before the student or their parents find out.
Step 2. Regulatory Compliance Establishes DLP Baseline
K-12 schools and districts need to comply with federal regulations like FERPA, COPPA, and HIPAA. Compliance also depends on where you are located. State student data privacy laws and data security regulations have become more popular over the past several years, as federal action lags behind.
Regulatory compliance should be just the baseline of your data loss prevention strategy. This is because federal cybersecurity and student data privacy laws, in particular, haven’t kept up to date with the changing technology, data use, and cybercriminals landscape.
Step 3. District Business Information
After you’ve laid the DLP groundwork to ensure you’re compliant with legal regulations, it’s time to take a look at your district’ss business data. Business information that you need to secure from improper use might include:
- Financial reports and information
- Payment/bank account information to vendors and contractors
- Human Resources information, such as W2s
Step 4. Internal Processes & Vendor Selection
Now that you have a handle on what the entirety of your information inventory looks like, what your regulatory compliance obligations are, and what information you need to secure for business reasons it’s time to put processes in place to manage it all.
People tend to think about DLP policies in terms of setting them up in their data loss prevention software. But we’re not quite there yet. Here we’re thinking in terms of a district policy that directs the human behavior element of data loss prevention.
What uses of each type of information category are acceptable and what is not allowed? Some examples might include:
- Human Resources information can only be accessed by the HR department
- Student data should only be accessed by user groups that need it, and may need to be further segmented. For example, teachers may need contact information for students’ parents and guardians and their IEPs, but their health information should only be accessed by the school nurse and/or counselor.
- District financial information should only be accessed by the accounting/finance department
- Only edtech vendors that have signed your data privacy and security agreement can access student data systems
Your DLP policy planning should also include requirements for vendor, contractor, and/or partner security requirements. This is an often overlooked area of a DLP strategy, but vendor data incidents are among the top reasons for data leaks and breaches impacting school districts. To use the cliche, your data loss security strategy is only as strong as the weakest link. The many operational benefits of an interconnected vendor system also expose unique cybersecurity challenges that must be addressed in any solid DLP plan.
Documenting these policies prior to going into your software helps in three ways:
- It helps you and/or your planning team organize your policies plan in a structured way
- It provides a formal document that can be incorporated into the employee handbook and shared with employees for training purposes
- It helps whoever is in charge of implementing and/or configuring the DLP software to efficiently and coherently set up each of these policies
Step 5. Building Automated DLP Rules & Policies
OK, so now comes the fun part! Now that you’ve categorized your data and you have processes and policies in place, you’ll want to get as much DLP policy management automated as possible. This means using a DLP platform to set up rules and policies that govern everyday use and behavior in your district.
There are many, many data loss prevention software and solution providers available on the market. The best one for your district is highly dependent on your specific IT infrastructure and unique needs.
But the basics are about the same. Any good DLP platform will allow you to set up rules that govern how a specific type of file or folder or software can’t be used. Then, there are policies to put in place that tell the platform what to do if that rule is broken. Policies can do things like send notifications and alerts, revoke sharing, quarantine, delete, suspend a user account, unsanction an application, etc.
Most experts agree that it’s best to start with a light touch here, and then incrementally restrict over time. With our customers, we typically recommend launching your 30-day free trial on “listen-only” mode. Meaning, you get automatically alerted when a policy is violated but the platform won’t revoke access or make any changes in any way. This allows you to make sure that your policies are set up properly before you start interjecting in peoples’ workflow. Once you have a good handle of what is going on in your environment, we can help walk you through how to start automating remediation for DLP violations in a way that will be most effective for your district.
Step 6. Educating Your Team
Studies show that educating employees on the importance of data loss prevention and district policies surrounding the matter can significantly improve your district’s security stance. They also show that continual reinforcement, rather than a one-time training event, is the most effective way to improve the inherent human element behind data loss.
This is an area where documented data loss prevention policies and processes (created in step four) are helpful. It provides everyone with the information they need to understand their personal responsibilities when it comes to company data security. It also outlines what is acceptable behavior and what is not.
Your DLP platform can be helpful as well. Most solutions provide the functionality to send the offending employee a notification email when they have done something that violates a DLP rule. Setting up these types of emails helps automate continual reinforcement of company data security policies and is beneficial to employees as well.
Step 7. Monitor & Strengthen
Data loss prevention should not be treated as a “set it and forget it” project. Particularly for the first several months to a year after the first implementation, you should closely monitor the efficacy of your processes and automations to ensure they’re working as expected, and to identify gaps.
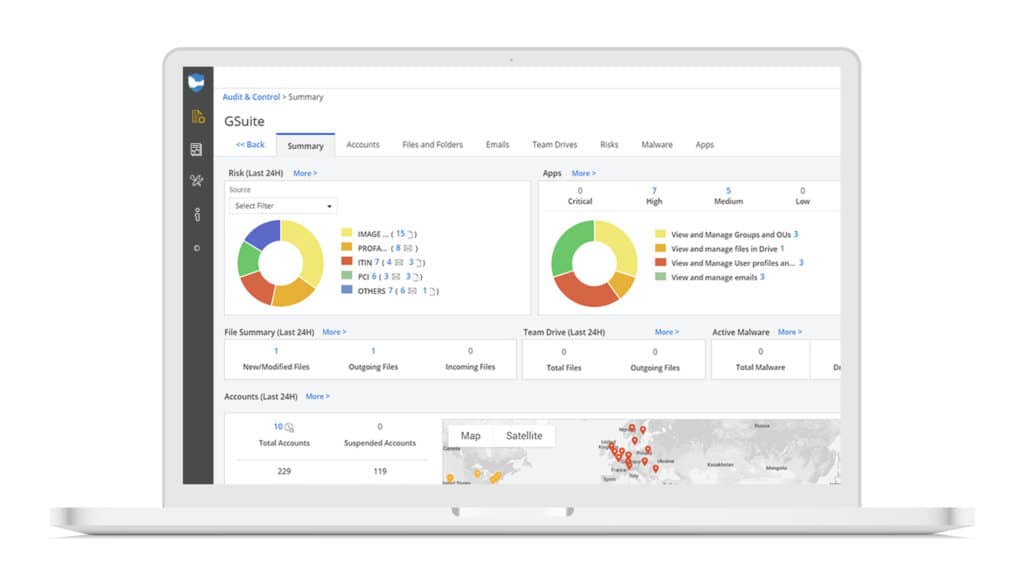
Your DLP platform will be key in this area. Investing in a platform that monitors your environment 24/7 means that you and your team can focus on other projects or tasks while the technology does the redundant work. Set up automated audit and risk reports, so that you gain quick and easy visibility into your data loss risks and can adjust as required.
Using This Data Loss Prevention Checklist
The specifics of how to prevent data loss in your district depend on a variety of factors—including the type of hardware and software you use and the level of data complexity in your domain. Therefore, it’s impossible to create a data loss prevention checklist that will apply to every district. Hopefully, this checklist gives you a solid framework for planning and tackling your data loss prevention strategy.
It’s important to note that if your team uses cloud applications, such as Google Workspace, Microsoft 365, Zoom, WebEx, Slack, Dropbox, etc. and you’re relying on firewalls to protect your data from loss, chances are high that your data is exposed. As discussed in step one, there are many locations where data may be located, and each of these locations represents a potential for loss. Many district technology professionals that we talk with on a daily basis don’t fully realize the unique challenges of securing data in the cloud as compared to on-premises.
The unique challenges of securing your district’s sensitive information in the cloud are important, but not insurmountable!
Sign up for a free cloud data loss prevention audit today, and we’ll help you determine where you have DLP risks in your cloud environment in a matter of hours.